
Lectures > A solution to a sound post-production problem on feature films in PAL's world
A solution to a sound post-production problem on feature films in PAL's world
This method resolves a lack of perfect synch, evidenced in the current sound post-production processes, from digital cut or positive transfer to the final copy, including VHS and DVD versions. This methodic proposal doesn´t involves radical changes in the flux or the working way. But it offers certainly of repeatable and exact synchs.
Note
This article was written in 2005.
What was the operational reality of our industry back then?
The vast majority of films were edited in AVID. Practically no one used Final Cut Pro for this purpose.
Production Sound was recorded on DAT and delivered to the AVID station with a 25 fps Time Code. The Assistant Editor, fed the production sound into the AVID by playing it on a TC DAT machine.
When the picture editing finished, that AVID output a cutting list used by the negative cutter to work on the film. A typical reel could have 200 to 300 takes, hold together with transparent adhesive tape.
That Reel was then transferred into a Standard Definition PAL signal. That transfer transport was moved at 24 fps, but, given that the video out on that machine, was set to PAL, the resulting picture was a 25 fps PAL signal. One second, was still one second, the only difference was that it was subdivided now in 25 parts instead of the original 24.
This led to the duplication of frames. One every second.
Well, this article was written at that time, with that technology.
Now, when re-reading it, it amazes me the amount of software, procedures and supports that had already become useless in such little time.
Despite that the article speaks of a different reality, than that of these days, the concepts here exposed are still legitimate.
Introduction
This method deals with a lack-of-sync problem, commonly present in actual Sound Post-Production processes from digital cut or Positive Transfer, to the final copy, including VHS and DVD copies.
This methodologic proposition doesn't involves any radical changes in the work flow. But it does offer the certainty of exact and repeatable synchronization.
- The problem's symptoms.
- History of the problem.
- The solution.
- Operative implementation of the solution (Part One and Part Two).
- AVI World.
- Delivery organization.
- Conclusions.
- Appendix I: The transfer room and the digitalized image.
- Appendix II: Introduction to Quicktime.
- Appendix III: A word on Cinema Tools.
1. The Problem's Symptoms
Film Sound Post-Production workers like us are permanently dealing with a problem:
Lack of synchronization consistency between picture and sound during the Post-Production stage, all the way to the final copy.
How does this statement manifests?
First of all, when receiving the sound OMF export that the picture editor delivers, we can see that almost none of the sound clips has full sync. The sounds are often 1 or (in the worst case) 2 frames out of sync.
Both the beggining and the end of the sound are almost never in the exact start/end of a frame.
This sound clips, sound files or regions (in ProTools language) are not to be found in “round” places, but instead they start and end in a spot “inside” of the frame, without matching on our Time Line Grid. We know, however, that the picture editor didn't cut sound clips on another spot other than the picture frame limits.
Therefore, this sound OMF exports should match perfectly with the frames grid in our work stations.
This, however, doesn't happen.
Later on, when we start working, we can see that in several opportunities we have problems syncing takes. For example, if we fully sync the first “P” or “B” of a text, some other dialog ocurring in the same take may not be in exact sync.
Plus, if by any chance, after syncing all the sounds in a Reel, we are given a new transfer from the same positive, we would see that all the efforts thrown into correct synchronization are now corrupted.
In this new transfer many sequences start or end one frame before or after. Most of the places where we've managed to put precise sounds, are now not where we've put them. Some are, but most of them are one frame displaced.
All of this while there weren't any Edits or changes on the positive.
Also, when watching the film final copy, we find that sync decisions now seem odd and wrong. Some dialog is clearly out of sync and, seen on detail, this feeling is persistent all along the movie.
We could say that this is caused by the picture editing software delivering faulty Negative cut lists or that the negative cutter made a mistake. But this is not the case.
Taking in consideration all of these, and as we already said, we only see picture and sound synchronization inconsistencies during the post-production process and including the final copy.
Needless to say, there are many processes involved in this stage, production sound edition, ADR, foley, Sound effects editing, etc. and a lot the work invested in such duties to finish off with an unwanted result.
The ones old enough to have edited sound in Moviolas do not recall dealing with these sync problems back then.
What you saw in the moviola was what you saw in the mixing studio and in the film premier.
What happened since then?
What has changed?
2. History of the Problem.
This issue started with the introduction of non-linear picture and sound editing stations.
In order to be able to work audio for film with those technologies, Sound Editors where given a transfer of the film picture on a video support. That was the technology available at the time, that started this practice and continues to this day.
To do these in the PAL World a method is utilized, in which the transfer machine moves the film postitive (or negative) to a speed of 24 fps, transferring those images onto a PAL video signal, that is, a 25 fps signal.
Everyone knows, though, that 24 is NOT 25.
So, How does the transfer machine deals with the problem of distributing 24 film frames into 25 video frames?
The answer is, by adding an extra frame per second.
This extra frame is added by duplicating a video field every 12 frames.
The system duplicates a field of the 12th frame and another field of the 24th frame in each second (see Appendix I).
Let us remember that every PAL video frame is made out of of two video fields:
- The first contains the odd sweep lines (1, 3, 5, ...).
- The second contains the even sweep lines (2, 4, 6, ...).
If every video frame is made of two fields, the transfer machine will convert, each second, the 24 initial film frames into 48 fields, and will add two more fields.
This way, the total amount of fields per second will be 48 + 1 + 1 = 50.
And, in frames per second, the number will be 24 + 1 = 25.
But these manipulation of the picture, is fiddling with the moment in which every frame is presented, resulting in every video frame “stepping ahead” (see Appendix I) of the film frames (and to the sound) until the time error is reset.
This explains why wee notice that NOT every consonant “P” or “B” inside the same take seem to be in sync. And these, while no one made any new cuts or edits on the picture or sound. It will depend on how these consonants fall into the time error cadence. In some the error might be 0, in others it may be displaced even a frame.
But it will never be exact or repetitive.
This, as we already saw, hardens every task in sound edition during the long process of film-making.
- Why do these problems occur?
Because we have broken the one to one relation between the picture with which we work on during post-production, and the film negative.
We have broken the direct frame to frame link, with the aggravating factor of introducing a non-repetitive error.
Thinking in general terms, if movies are filmed at 24 fps all around the world, here, in Spain, in the USA, or in Lebanon and are projected at 24 fps all around the world, in Brazil, Philippines or Mongolia, etc. Why do we post-produce at 25 fps?
Because, as we said, with the arrival of virtual editing stations there was no other way of delivering picture to sound editors, given that the closest, cheapest and more available format at the time was PAL video.
- The question that rises is, Is there a chance to use the same materials, the same machines, the same players, but in such a way that it allows us to return to the old trusty “One to One”?
The answer is, Yes, it is.
3. The Solution
The answer to this problem is to return to the same amount of frames that the negative had, and to play them at the same speed at which they were exposed and at which the film will be played.
The solution is based upon the manipulation of certain Quicktime file properties, a technology available at this very moment.
To deepen into this methodology we must first define what is Quicktime (see Appendix II).
Roughly, one could say that a Quicktime file is a bag of data AND a recipe explaining how to reproduce it.
Such data could be picture frames, audio, text, MIDI notes, graphics, etc.
The recipe explains at which speed that data must be reproduced, in which moment it should appear and disappear, among other many things.
If we could have every frame of the film positive (or negative) in that bag, without any of them being duplicated, and ask QuickTime to reproduce them at 24 fps, we would be in the same “One to One” condition we had in the Moviola era.
That is to say, we would have the same amount of frames, the same fps speed with which the film was captured and the same fps speed in which the film will be played at the Movie Theater.
The problem is that, although we could set the transfer machine to “work at 24 fps” there isn't a standard video format whose frame cadence is 24.
The speed of PAL format is 25 frames per second (with 50 fields per second) and NTSC speed is 29,97 frames per second (with 59,94 fields per second).
The only video format that truly runs at 24 fps is High-Definition 24p.
But, if instead of asking for a standard video transfer, we ask for High Definition, In which support would we receive such video? Do we have a 24p High-Definition player in our studios?
So, the question is: How do we do it?
Let's see:
The first thing to do, is to convert exactly the same amount of film frames into video frames. With the current technology the easiest (and only) way to do this, is to move the transfer machine transport mechanism to 25 fps ( and not 24 fps), and to convert this signal in PAL video format.1
At these speed, every film frame will have his twin brother in video.
This way, we obtain a “One to One” relation.
This will be an ordinary and common PAL video cadence. Without any duplicated field or frame. And we can digitalize it and convert it into an ordinary 25 fps Quicktime file.
There is just one problem: the resulting picture is 4,1666667% faster in speed than how it was filmed and how it will be reproduced.
At this point we need to order Quicktime ... “Play every frame in your data bag slower. To be exact, 4,16666667% slower”.
Or, in other words ... “Every frame in this bag was born with a recipe in which every frame was to be shown during 1/25 of a second (40 miliseconds). Well, I would like you to modify such recipe, to make the duration of each frame 1/24 of a second (41,6666667 miliseconds), which was the duration of these frames when they were filmed and which will be their duration when they play the film on Movie Theaters”.
If we could change this item in the recipe, we would re-establish the much wanted and trusty “One to One” relation.
1 This is not new. In the advertising world of countries that work in PAL it works this way. They shoot, transfer, edit, mix and play at 25 fps.
4. Operative implementation of the solution
Part One
How can we establish these dialog with QuickTime?
The tool that allows us to do so is Apple's Cinema Tools software.
This is a sidekick program to Final Cut Pro. With Cinema Tools, turning a Quicktime movie from 25 fps to 24 fps is simple and fast.
Let's see how it's done: Once the program it's open we go to File > Open Clip, and we navigate until we select the file. Afterwards, a window will open with the selected movie and some buttons.
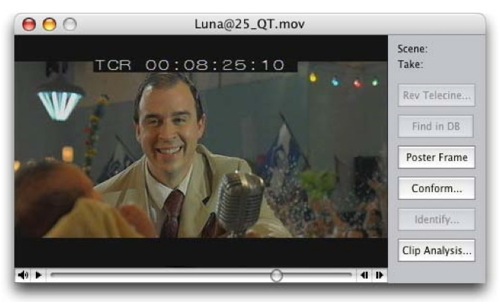
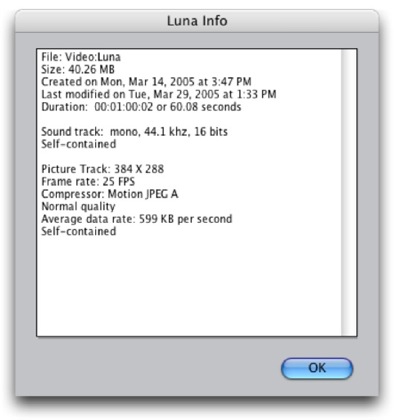
If we click on the “Clip Analysis...” button a window with all the relevant information will pop up.
We hit “OK” and then we click on the “Conform...” button.
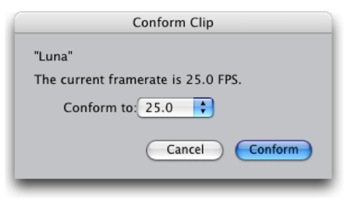
This new window will inform us that this movie frame rate is, effectively, 25 fps, the way it came out of the transfer. If we click and hold the mouse button over the 25.0 that follows “Conform to:”, we will see the frame rate convertion options that this program offers.
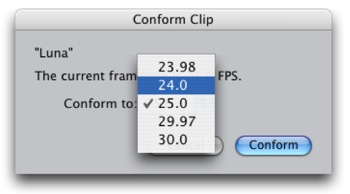
Choose 24.0 and press the “Conform” button. This process will take 2 to 3 seconds. When it ends, if we click again on the “Clip Analysis...” option, we can check how the relevant information has changed.
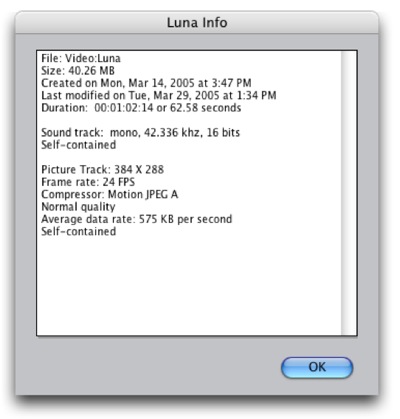
This way, we probe that:
- First of all, it is shown that the frame rate is now 24 fps, when it previously was 25 fps.
- Second, the duration is now 1 minute, 2 seconds and 14 frames, when it previously was 1 minute, 0 seconds, 2 frames, what it should last if the original movie was to be played at 24 fps. That is to say, 4,166666667% slower than the original.
- Third, if we compare the average data rate on both versions, we will see that their values have changed proportionally. While the original 25 fps file, presented 599 KB per second, the 24 fps version is 575 KB per second. Meaning, that a real 24 fps movie will be a little less demanding of our internal CPU usage, than a 25 fps one. Better for our ProTools.
Let's check now the amount of frames. First, the original 25 fps version.
We said it lasted 1 minute and 2 frames.
(25 frames x 60 seconds = 1500 frames) + (2 frames)
+ 2 frames
1502 frames
Now let's do the math with the version conformed at 24 fps. We said it lasted 00:01:02:14 (1 minute, 2 seconds and 14 frames).
(24 frames x 60 sec. = 1440 frames) + (24 frames x 2 sec. = 48 f.) + (14 f.)
+ 48 frames
+ 14 frames
1502 frames
As seen, this procedure guarantees that the amount of frames is the same no matter the speed at which it will be played (@25 fps or @24 fps).
Let's check now if the total duration of the new movie is correct using a Time Code calculator.
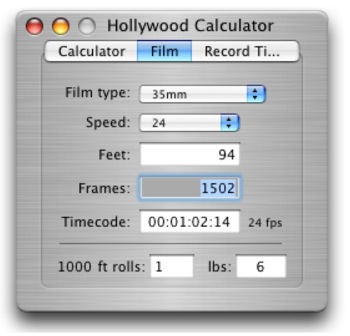
We open it, select Film and in the Frames field, type 1502.
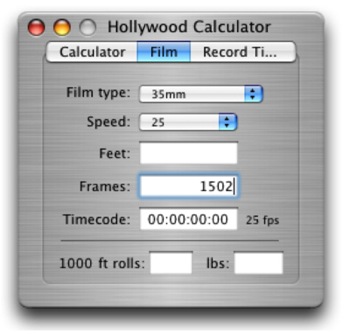
When we hit Enter we will be asking the software to show us the duration of a film containing that amount of frames when it's played at 25 fps.
It correctly shows the actual duration of the original QuickTime movie, when played at 25 fps.
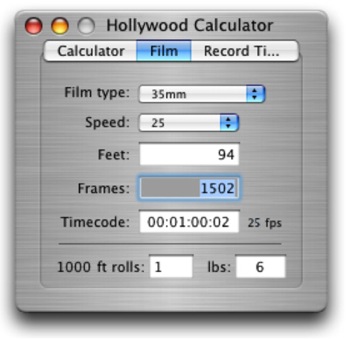
Then, we ask for it to show us the duration of a movie containing that same amount of frames (1502), but, moving at 24 fps.
That (00:01:02:14) was the duration of the Cinema Tools processed version.
We can say then, and without any doubt, that we have satisfied the “One to One” needs.
Part Two
- In which ways does working with a 24 fps picture affects our task?
In a very small amount.
Let's talk about the tool that almost all sound editors use, ProTools.
It would only take to change in the Session Set Up (Command + 2) window the Time Code Rate from our 25 fps standard to 24 fps to overcome any problem. This way, the ends of the video frames ( converted to 24 fps) will now match with the Edit Window Time Code Grid. There is no need for a special player with these type of 24 fps QuickTime movies. The same standard QuickTime player can work with these new recipe, knows what to do with those frames, and can do it. In other words, QuickTime doesn't care playing a movie at 24 fps or at 25 fps, for the same reason it doesn't care to do it at 29,97 or at 30 fps. To the software, all of these frame rates represent the same challenge.
Another virtue of this change:
Now, the sounds imported from the off line editing suite will drop at the exact borders of the 24 fps picture.
Why? Because the Time Line from these Picture Editing Softwares used to edit film (Avid Film Composer, Final Cut Pro, etc) is at 24 fps. Meaning that all off their exports have all the properties of that time measurement.
And what about the Mix?
Well, not much.
In the case of dubbing rooms that work with picture being output from a Video Card installed inside the computer CPU, the workaround is to go to the Session Set Up window in ProTools and change the Time Code Rate from 25 fps to 24 fps. Almost all video projectors and all data projectors (VGA, etc) can handle this signal.
The international dubbing rooms equipped with film, and not video, projectors, use an interface to transform the bi-phase pulse cuadrature from the projector into TC format at the room engineer's likings. It's a very simple thing to change this setting so that, instead of TC at 25 fps, the studio delivers 24 fps TC. All of the mixing tables accept, for automatization purposes, all of the Time Code formats.
In other words, there are no Europe or USA oriented mixing tables. They are the same. It's just a simple settings change.
But, even then, there are many tables that always worked distributing 24 fps TC. That is the case of Cine Arte de Madrid. When one came to mix in that room, the very first thing you had to change in the ProTools playing our tracks was the Time Code Rate of the session, from our original 25 fps to the Cine Arte standard of 24 fps. They have their room configured for that standard. Anyway, if somehow there was a dubbing room which didn't accept any other TC other than 25 fps, well, without effort we'll just change our Time Code Rate from 24 to 25 fps and that's it. ProTools will continue to play the same amount of samples per second, it won't accelerate or slow down at all.
There's another item pending, on-screen Time Code:
Let's see. The main use of a burned on-screen Time Code window on a video picture is to check that during digitalization the video card didn't skip frames.
Rare, but not impossible.
The transfer room often burns a Time Code window in the upper part of the frame.
Which Time Code format?
25 fps, of course.
With our solution, by exposing the image to the Cinema Tools time stretching, the burned Time Code (converted into a part of the video signal inside every frame) will, obviously, be “stretched” as well.
So, will end up having a 24 fps movie with an incorrect TC window.
Given that the procedure is to synchronize the QuickTime movie with the Time Line, in such a way that the burned TC window matches with the Pro Tools Time Line TC, after the first second they will cease to be in sync. After the first 24 frames, they will start to differ, at a reason of 1 frame every second starting from the beggining of the movie.
Is there any information, signal or data able to accompany every frame, no matter the playing speed, capable of identifying every frame and still be recognizable for both the operator and the Sound Edition team?
Yes, there is. Feets and Frames (F&F).
F&F is standard in countries such as USA. It was standard, too, during the Dolby Digital Print Master process before the DMU equipment came along. Feets and frames was the information requested by the Dolby PC in order to know where were the first and last frames of the reel. That way, the Pull Up needed to join the first sounds of the next reel with the last sounds of the previous one, in order to minimize trouble in reel changes, could be done. And, obviously, it is also standard in every internal step of picture labs.
Another proof of it's standard status, is that ProTools includes it as an option in it's counters, that the countdown with wich we start every reel has exactly 12 feet + 00 frames and that the beep is located exactly at 9 feet + 00 frames after the Start.
But, wait a minute, Where does the F&F count should start?
0000 Feet + 00 Frame, should be at the Start of the countdown so that 9 Feet + 00 Frames contains the beep, and that 12 Feet + 00 Frames matches with the first frame of the reel.
But if we order the transfer room to “Burn F&F instead of Time Code”.
How do we proceed in ProTools?
It's easier to explain in ProTools 6.4 (or superior), but is also doable in previous versions.
In PT 6.4 (or superior) we should set from the pull down menu at Windows > Show Session Setup, 24 fps in the Feet + Frame Ratio. In the Edit Window, we must change one of the counters (Main or Sub) to Feets and Frames, and leave the other one in Time Code. Why? Because sometimes we need to ask questions to the picture editor, like a thing going on at a given Time Code. And what Time Code should we mention? The same he has on his Time Line. Because his Time Code is 24 fps! Not 25 fps!
Let's move on. Now, we synchronize the first frame of image against the hour that identifies the reel (at 01:00:00:00 hours for the first frame of Reel 1, and so on). Then we step back 8 seconds, 00 frames. We should be right at the Start of the countdown.
Because exactly 8 seconds (12 feet and 00 frames on 35mm) is the lenght from the Start to the First Frame of the Reel (FFOA, First Frame Of Action).
Leaving the cursor at that spot, we should now go to the Setups > Redefine Current Feet + Frames Position...
A window will pop up. In the Freet + Frames field, we'll type 0 and hit OK.
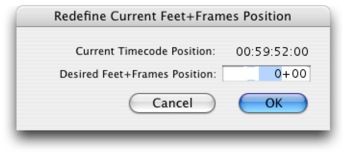
From now on, the Feet + Frames counter will be synchronized with our QuickTime burned window. We must go to the last frame of the reel to check if the Feet + Frames on our ProTools counter and the Feet + Frames shown in the QuickTime burned window match. If they don't, it means that one or more frames were “skipped” during the digitalization process.
If in order to define an specific location inside the movie, we find more comfortable, by force of habit or another reason, to keep working with the visual and mnemonic TC structure, we can still do it, and thus, the F&F display should be our secondary counter, or Sub, which will only be used to check that no frame was skipped during digitalization. We should use then, the Main and Big Counter as TC (at 24 fps).
For 5.x.x versions of ProTools, the way to tell the software that we would like that the F&F counter starts at 0000 Feets + 00 Frames given a specific place in the Time Line, is to tell it that that's were the Session Start Time is located. For Reel 1, for example, we should start the session in 00:59:52:00. For Reel 2, it will be at 01:59:52:00. Session Start Time is set in Windows > Show Session Setup.
A possible hassle in 5.x.x versions could happen if the movie has a frame before the Start. Given that ProTools won't let anything be set on it's Time Line before the time of the Session Start Up, we should then, cut any picture before the word Start.
This is only necesary in 5.x.x versions.
Sessions created in 5.x.x versions with these counter settings are 100% compatible with 6.x.x versions. Sessions created in 6.x.x versions are 100% compatible with 5.x.x versions, as long as there are no frames before the Start.
Now a question arises.
Could these method be useful in movies in which there is no positive transfer for sound post-production?
Yes.
In those cases in which the picture editing took place on Avid Film Composer equipment, in order to make a Digital Cut for our job, the Avid asks the operator, “At which speed should I play the open Time Line: at Film Rate (24 fps) or at Video Rate (25 fps)?”
The only Digital Cuts we have known when it took place a standard film project were those played at Film Rate. In those cases, it's Avid the responsable for duplicating a frame every second. We have here the same problems found if there was a transfer being made at 24 fps over a PAL signal, and the same problems we are trying to overcome.
Instead, with the other option, Video Rate, Avid will play his Time Line picture at the same speed it digitalized it: 25 fps
Becasuse, let us remember that the only way Avid or any other virtual picture editor has of delivering a healthy and correct cut list for the negative cutters, is to know clear and unequivocally how every one of the frames involved in it's Time Line are called.
Avid too needs, and that's why it uses it, the mentioned “One to One” relation.
In it's case, it is achieved by receiving 25 fps transfers from the daily film negative. When playing this picture, it duplicates a frame every second for those images to be “relatively” in sync with the production sound (which doesn't get modificated in speed) because it's time line is at 24 fps.
If we get a Digital Cut at Video Rate it would be to us, exactly the same than receiving the type of transfer we are asking for this method. Which means, that once the Digital Cut (at Video Rate) is digitalized and the reproduction recipe (the QuickTime headers) are changed via Cinema Tools, we would be in the desired, and so extensively explained here “One to One” condition.
Final Cut Pro (FCP) faces this issue in a different way.
FCP too needs, same as Avid, to keep a One to One relation with the picture negative in order to guarantee that it's cutting lists are faithful. But FCP doesn't duplicate a frame every second (as Avid does), intead, it stretches the length of each frame by 4.16666667% (from the transfer's 1/25 of a second to 1/24 of a second). That way, a film project Time Line in FCP is 24 fps (same as Avid).
FCP is able to export QuickTime at 24 fps directly from it's Time Line without the need to process anything with Cinema Tools. So, if the film's picture editor in which we will be working on sound, edits with FCP, we could ask him to export for us the “Digital Cuts” from the film reels in QuickTime format at 24 fps, given that they will have a “One to One” relation with the negative that the Time Line refers to and with the negative cut list.
Finally, it would be good that the transfer room could also burn a small window in one of the upper corners with the text “Reel 1”, “Reel 2”, etc, all along every reel. We say this would be a good thing because, when we ask the transfer room to burn F&F rather than TC information, we won't be having the hour as a reminder of which reel is the one we are working on. A thing that it's still useful.
What will happen with the sync when a movie that was post-produced with 24 fps picture gets distributed in VHS and DVD?
Let's see. To make a VHS duplicate, a PAL Master is needed. A PAL Master it's a negative transfer or Dup moving at 25 fps over 25 fps PAL video format. As already explained, this transfer will generate the same amount of frames that the original film has. It won't have any duplicated frames. This transfer will be exactly the same as the work transfers that we were given to do sound post-production.
Ergo, sync will be 100% the same as in the final copy, as the one seen on the dubbing room, as the one seen in our ProTools.
What will happen with the DVD distribution?
In Argentina, to make a DVD duplicate you need a NTSC Master.
There are three ways to achieve this transfer: 1) By the transcodification of a PAL Master, 2) By negative transfer or Dup into a NTSC video signal and 3 ) By reproducing a Hi Definition 24p Master at 23.976 and making a downconversion from the original 1080 lines, to the 625 PAL.
If the path chosen by the producer is to make a transcodification from a PAL Master, the result will be like the one obtained on VHS distribution. The same amount of acceleration applied to the sound we made for the VHS will be needed to deliver the sound to the DVD maker.
If the producer chooses to transfer from NTSC, or downconvert from the 24p Master, the negative or Dup will move at 23.976 fps in the transfer machine. In other words, the picture will be 0.1% slower in speed than the original in which it was filmed and at which the sound was recorded, edited and mixed. It will only take to slow down the sound 0.1% to keep all the sync with wich we battled during sound post 100% accurate.
5. AVI World
One of the interesting things about post-producing film sound with 24 fps movies is that this concept is not exclusive to QuickTime World. It's still appliable to the AVI World. It won't take Cinema Tools, but instead, other programs to be able to change the frame rate of an AVI file.
But, What is AVI?
Audio Video Interleaved (AVI), which was defined by Microsoft at the beggining of the 90s, is the most common audio and video data format on PC's. It's internal organization is quite resemblant to that of a QuickTime, at least to our user eyes. AVI is the name of the “movie” containers on PC World. Although with different names, their parts work in a very similar way. What we call Atoms in QuickTime, is called Tags in AVI, to give an example.
Well, we found several freeware softwares that do what we need. At least two of them seem to have been created for our goal: To change specific AVI “movie” Tags in order to play 25 fps video at 24 fps. That is to say, this software modifies the Tag that defines the reproduction length of each frame of the movie from the initial 40 miliseconds (1/25 of a second at 25 fps) to the 41,166666667 miliseconds (1/24 of a second) needed for it's speed to be 24 fps.
The first of these programs is called AVI Frate (AVI Frame Rate Changer v 1.10). It's the simplest of them all and can be donwloaded:
http://www.doom9.org/software.htm
Once there, we have to click on Download and look for the “full software link”, there, and inside the “AVI Editing Tools” subcategory, we will find AVI Frate v1.10 (Its size is only 138KB).
Or from:
http://www.free-codecs.com/download/AVI_Frame_Rate_Changer.htm
The second software is called AVI Frame Rate Adjust v 1.00 (Its size is only 60KB) and can be found at:
http://www.afterdawn.com/guides/archive/how_to_fix_avi_sync_problems.cfm
Let's take a look at how to work with “AVI Frate”:
We open the software. A small and simple window will pop up.
We click on the folder icon, which lets us navigate our way to the movie we would like to process.
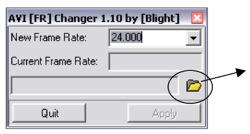 To open files
1- Open the software
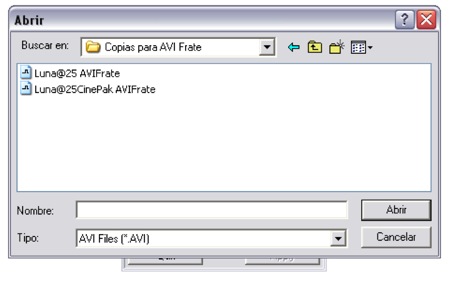
2- Find the file we want to process.
Once the AVI file is selected and opened, the program will automatically, on the “Current Frame Rate” field, tell us what is the file's frame rate, that is 25 fps.
3- Open the file.
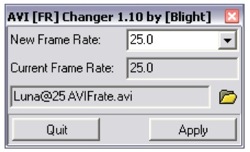
In the only editable field of the window, click and hold, select 24 with the cursor and release the button. Then, hit “Apply”.
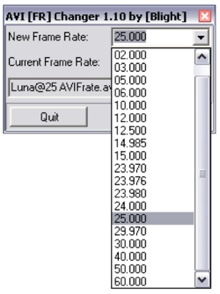
4- Select the new frame rate.
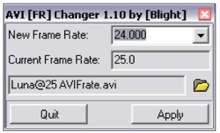
5- Hit Apply.
A new window will tell us that a new frame rate will be applied to the file. Hit “OK”.
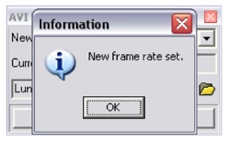
6- Click on OK to finish the operation.
Done!
From now on this file can be seen on software such as Adobe Premiere Pro, Nuendo, Sonar, etc, as a 24 fps movie.
Let's see, now, how does “AVI Frame Rate Adjust” works:
When opening the program, the next window will show.
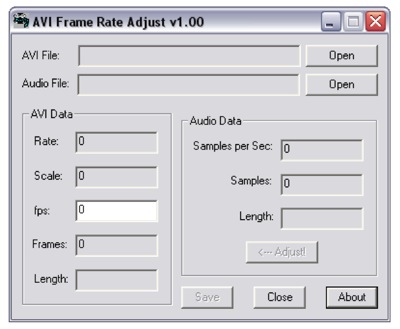
1- Open the program.
We need to click on the upper “Open” button to open the AVI file.
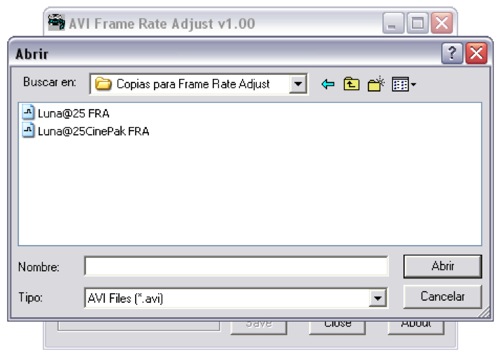
2- Search for the file.
Open the file and all the actual information and properties will be shown.
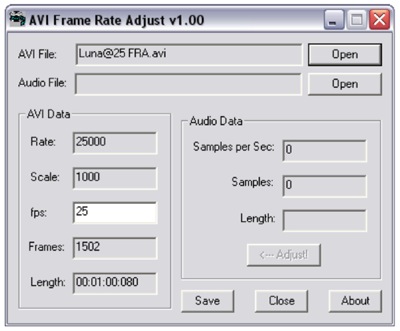
3- File properties.
Once the file is opened, type, in the only editable field (“fps”), the new frame rate which we want to apply. In these case, 24 frames per second.
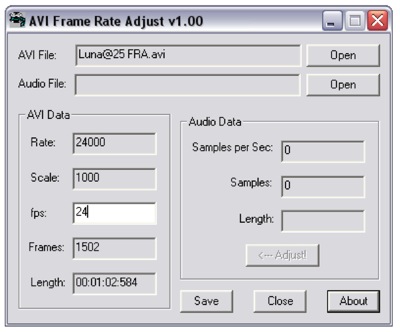
4- New frame rate already typed.
Now, hit “Save” and with that the changes are applied. The length of the movie will be modified in proportion with it's new speed.
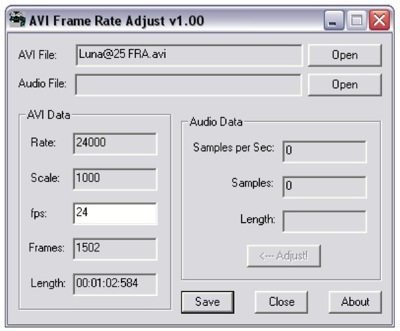
5- New file properties information.
It's fair to mention that these software sub-divides the second into miliseconds. So, the 80 miliseconds of the initial 00:01:00:080 length at 25 fps should be interpreted as 2 frames. Because at 25 fps, every frame lasts 40 miliseconds. The same applies to the 24 fps end result.
6. Delivery Organization
With all the mentioned, it is clear the the most efficient way to receive the picture, for sound post-production, is within a QuickTime container, on CD or DVD support. Copying the file to our hard drives occurs at far superior speeds than that of a real-time video support.
At the same time, we saw that the variable changes in the reproduction recipe is instant and non-destructive.
Plus, the posibilities of error involved in the copying process from one support to the other, are inexistent.
The support cost (CD or DVD) is low.
In contrast, there are plenty of chances for a mechanical error to occur on video supports: U'Matics, Beta SP, VHS, DV, etc...
Video supports are exposed to dirt, wear and tear, differences between the recording device and the player, etc.
Their cost is important.
Video transports are expensive, as well as their maintenance.
On the other hand, there are new support formats (totally incompatible between each other, of course) emerging all the time as well as video signal types (24p is a good example). To continue investing on video reproduction equipment has become unnecessary to develop our job.
7. Conclusions
The presented method allows us to:
a) Guarantee consistency in all the sync decisions made during sound post-production all the way to the final film copies. This consistency extents to all distribution variables: VHS or DVD, PAL, NTSC, or 24p.
b) Maintain sync in 100% through any other new picture transfer.
c) Change the headers fast and easily. This is safe, reversible and non-destructive.
d) Work with a Feet + Frames information window, helping to pin point the FFOA (First Frame Of Action), and the LFOI (Last Frame of Image) that the Dolby processor needs when doing a Dolby Digital Print Master, and to control the loss of frames during digitalization.
e) Obtain the extra benefit of being delivered the transferred picture of the film's reels into CD or DVD supports, and into a QuickTime container. This is advantageous economically, as in the speed of these data to be copied (because it takes place faster than real time), and it's flexibility, given that we no longer need to have media transport equipment of every new format that emerges in our studios.
APPENDIX I: The Transfer Room and the Digitalized Image
This appendix pretends to explain two things:
a) What happens in the transfer machine when we force into a PAL Video signal train, the picture inherent to a positive ( or negative) moved at 24 fps? And...
b) What happens when we digitalize this video cadence?
As we were saying in the main part of the article, the transfer machine duplicates a video field every 12 frames.
In the figure there are shown the alignement of a second of film frames (24) named from frame “A” to frame “X”. Below, the video frames coming out of the transfer machine are shown.
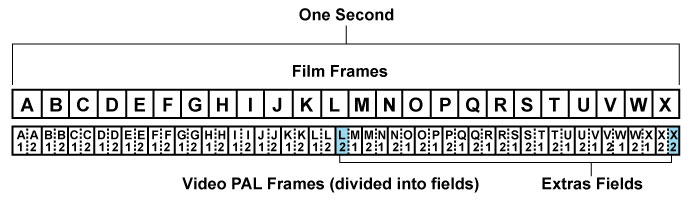
Note: the subscript indicates the number of field.
1 indicates the odd fields and 2 the even fields.
By ordering the transfer machine that we want it's video output to be PAL, it will have no other choice but to split the second in 25 parts. Given that the film pictures in that period of time are 24, it duplicates, as we said, one field from frame “L” and another one from frame “X” (those frames are highlighted in light blue and under the name “Extra Fields”).
Let's supose we could have, side by side, two mechanicaly syncronous players: One machine would reproduce film frames, and the other one, video frames. As we move frame to frame, we would see clearly how the video frames step ahead2 of the film frames.
2 The term “step ahead” is not accurate. Obviously, the transfer machine can't guess which film frame will come next. It doesn't know if is a landscape, a hanging rope over a gallows, or the close up of the main character's image. Therefore, the film frames can't step ahead. What happens here is that the transfer machine has a buffer where is holds a Video PAL field (20 miliseconds) and releases it in time according to the need that Video PAL's standard demands. On the other hand, the TC “train” is delayed in that amount of time. As a result, when “drawing”, with a simultaneous beginning, both streams of frames (the film and video frames) the mentioned overtake can be seen.
As time passes by we can observe a greater difference or time error. When we get to the video frame composed of fields L1 and L2 the transfer machine duplicates the L2 even field. Thus, the 13th video frame, is composed of a L2 and an M1 field. With these action, the time error resets back to zero, given that at the exact moment that the film frame “M” starts, there is a video field playing it too, M1. But, from this point, the time error will once again begin to grow. By duplicating field L2, the transfer machine pushed backwards on time the arrival of the first video field referring to the film frame “M”.
In other words, the transfer machine delayed the M1 field until it was in sync.
We've reached the video framed composed out of fields L2 and M1. During the next half second, video frames will be formed by one field corresponding to the previous film frame, and another frame corresponding to the ongoing film frame. This continues, until the last video frame of that second, which is composed out of the two even video fields of film frame “X”. Up until here, the maximum time error that the transfer will generate is only half a frame. It's not a constant error, but instead, the stepping ahead of the video signal, is continuously variable between 0 miliseconds (perfect sync), on video frames A1A2 and L2M1, and 20 miliseconds (half a frame @25 fps) on video frames L1L2 and X2X2.
U'Matic, Betta SP, VHS or DV cassettes we receive from the transfer room contain this cadence and these time errors. But when we digitalize this cadence, we are adding another imprecision: Almost everyone, as almost every non-linear picture editor, digitalize one field per video frame instead of two. This helps not overloading our Digital Audio Workstation CPU internal buses bandwidth. If we just digitalize only one of the two fields, the internal bandwidth required for playing purposes is diminished by half. It's a great benefit. On the other hand, during each second's first half, the second field, the one containging the par sweep lines, is almost the same as the non-par field. There isn't any information there different to the first field. In the transfer room, each frame was scanned twice: Once form the non-par lines of the first field, and once for the par lines of the second field. During all the time in which these two sweeps took place, the film frame was immobile on the scanning screen.
This is different than what happens when we explore a standard interlaced video camera filming real life, actors, a passing car, etc. In these cases, both video fields could be different from each other, because while the scanning takes place, reality keeps moving.
Instead, when scanning a film frame, reality is frozen. It was already frozed by the film camera. This way, the second field will be practically the same as the first. Given this, digitalizing only one field makes a lot of sense. And it makes no difference either you digitalize even or odd fields.
Let's supose then, that we choose to digitalize the odd field, the very first one that arrives. Let's do these checking the previous diagram.
By digitalizing odd fields, the cadence will be:
A1 B1 C1 D1 E1 F1 G1 H1 I1 J1 K1 L1 L2 M2 N2 O2 P2 Q2 R2 S2 T2 U2 V2 W2 X2
(and the wheel keeps turning)
We can see that during the first 12 video frames, the odd field (1) is digitalized. This is constant until film frame “L”. This frame will be digitalized two times. First the odd field, then the even field. That's why it's marked in red. To help recongnizing it. Out of the two field duplicates that the transfer machines generates every second, only one of them will be digitalized by us: the one that belongs to film frame “L”. Field duplication occurring on film frame “X” won't be digitalized, because the first video field of that frame presented to us is occupying an even field, meaning that we won't digitalize it. The second video frame that arrives of film frame “X” (the X2) will be the one taking place of the odd, ergo, will be digitalized. This way, we will only digitalize film frame “X” once, given that it's duplication (the second X2), is found on a even field.
If we would have chosen to digitalize only even fields, the duplicated frame would be X, instead of L. But, no matter what, when asking a picture digitalizer software to use only one field, whichever it is, we will be increasing the time error twice than what it was when it came out of the transfer machine. That is why, on practice, this sistem generates an accumulative error of a frame. Twice the error that the transfer machine introduced.
With these pictures containing such time errors is with what we are working in PAL World.
APPENDIX II: Introduction to Quicktime
We don't consider the comprehension of QuickTime programing vital, but it's surprising the lack of diffusion it's concept, components, it's implicances, and the way one could fiddle with them has. QuickTime is truly complex. One look to it's variables is enough to take your breath away. There are a lot. Let's just focus on the very, very basic ones.
QuickTime utilizes the metaphor “movie” to describe time based data, Any time based data can be organized as a “movie” (video, audio or both). These “movies” are like capsules, containers, holding all the necessary information to organize data through time, but don't contain the data (pictures, sound, etc) itself. In other words, we are talking about the recipe or instructions needed to reproduce that data. “Movies” are made out of data bursts called Tracks and each track references and organizes a data sequence in an organized way through time. To do so, Tracks contain Media Structures referencing real data (pictures, sound, etc). At the same time, Media is organized inside the track in pieces (chunks) of Media data called Media Samples. A typical QuickTime “movie” contains both the movie structure and it's Media, assembled in a way that it can be easily transported or downloaded from internet, for example.
In other words, QuickTime has three main cores:
- The Media,
- The Tracks and;
- The Movie.
The Media is the lowest level data structure, it is, in fact, the video/audio/text itself. Media is organized in Samples, that could be either frames when dealing with video, or samples on audio, for example.
The Tracks are the data structures describing the localization of the media and organizing it's correct decodification (a decoder for audio, a decoder for video, etc.).
The Movie is the highest level QuickTime establishing element. It is the containers where all of the individual tracks assemble. The Movie is also responsable of keeping tracks in sync with each other.
Regarding the structure, it is divided into many parameters. Let's take a look at the ones we are more interested in.
Movie Time - Time Coordinating System:
The QuickTime “movie” organizes media through the time dimension. To be able to work in these dimension, QuickTime defines a Time Coordinating System. This sistem coordinates “movies” and Media data structures with a common time measurement, the SECOND. Each Time Coordinating Sistem establishes a Time Scale, and that scale establishes the translation between real time and “movie” time. The time scales are arranged in X Time units per Second. The Time Coordinating Sistem also defines the “movie” length, or the Media Structure, in Time Units. That way, a particular moment on a “movie” can be iddentified by the number of time units that set it apart from the beggining.
At the same time, each track on a “movie” has an offset and a duration. These attributes determine when should a track be reproduced and for how long. Each Media Structure has also his own Time Scale, which determines the default amount of time units per data sample, on each kind of media.
Time Scale
The Time Scale is the master ruler on a “movie”. Each event inside a movie is measured and located through the time scale, and that scale is expresed in units per second. The length of a given element inside a “movie” is the amount of time scale units from beggining to end.
Each track in a movie has also an offset specified in time scale units. This offset marks the starting point of that given track. A track starting at the same time of the begginign of the movie has an offset of 0 (zero).
Each movie has a Time Coordinating Sistem, but that sistem can differ from “movie” to “movie”. The Time Scale in a Time Coordinating Sistem in a “movie” should have the convenient amount of fractions on a second. The scale should be presented in a way that makes the translation from “movie” time to other scale, easy.
A “movie” Time Scale of 600 (the default Time Scale on a new QuickTime “movie”) can translate a playback speed of 24 fps. With a 24 fps time scale, every frame will be displayed for 25 time scale units (600 / 24 = 25). In the same way, a Time Scale of 600 units, can work with 25, 30, 50 and 60 frames per second. Media with many samples per second (as in digital audio, which can have a sample rate of 48000, for example) is specified in amount of samples per time scale units. In the case of digital audio, it's time scale is seconds. So, we'll just say, that the audio track is 48000 samples per second.
The duration of a “movie” will be, given this, the total number of time scale units from beggining to end. A track in a movie will have a shorter duration if it doesn't extends to the end of the movie. In these case, the Media Chunks, which the tracks refer to, will have a shorter duration.
Media Time Scale
Every Media Chunk is referenced by a track with it's own time scale determined by it's sample rate. QuickTime will translate between a “movie” time scale and the various Medias involved time scales automatically. QuickTime does this, not the aplication running QuickTime. For example, ProTools, or Final Cut Pro.
Another example is to imagine a “movie” containing one video track, one audio track and one text track. The “movie” has a 2 seconds duration, and it's default time scale is 600. The video track starts along with the “movie” (offset 0), runs to the end (duration 1200), at 25 frames per scond (a Media time scale of 24 time scale units). The audio track also starts with the “movie”, and runs to the end (offset 0, duration 1200), at 48000 samples per second (the time scale of these media is 48000). The text track contains only one frame, the title, which appears at 0,25 seconds of the “movie” and lasts 1 second (offset 150, duration 600, time scale of Media 1).
Playback Time Base
QuickTime establishes the reproduction time base when you play a “movie”. That base consists of the time coordinating sistem of the “movie”, the Rate, a “current time” concept and a reference to time components that deliver QuickTime real time information. The Rate determines how many time scale units run per real time units. The Rate also determines in which way the “movie”; is reproduced, forwards or backwards. If the value is negative, the movie should be played backwards. If a “movie” with a time scale of 600 has a Rate of 1, QuickTime will process 600 time scale units of the “movie” each second moving forward, and the “movie” will run at normal speed. A Rate of 0,5 will result in 300 scale units of the “movie” processed per second, and the “movie” will play at half speed. A Rate of -1 will result in the “movie” being played backwards at normal speed.
“Current Time” is simply the location expressed in time scale units in which the “movie” is while it's playing. “Current Time” value can be any number between 0 and the total duration of the “movie”.
Headers
Each of these concepts are built from a series of small pieces called atoms. There are ton of atoms. This are referenced between them, harmonize with each other and are coherent with it's siblings. Generally, there's no way of altering only one of them, doing so means one has to alter every atom related to that specific one.
Their names mean nothing to us, the not initiated. For example:
mvhd - tkhd - edts - stsd
There's a free Apple software called Dumpster (made for software developers) that allows us to examinate a QuickTime file, and even edit the values on each atom.
Let's take a look at how Dumpster sees a “movie”.
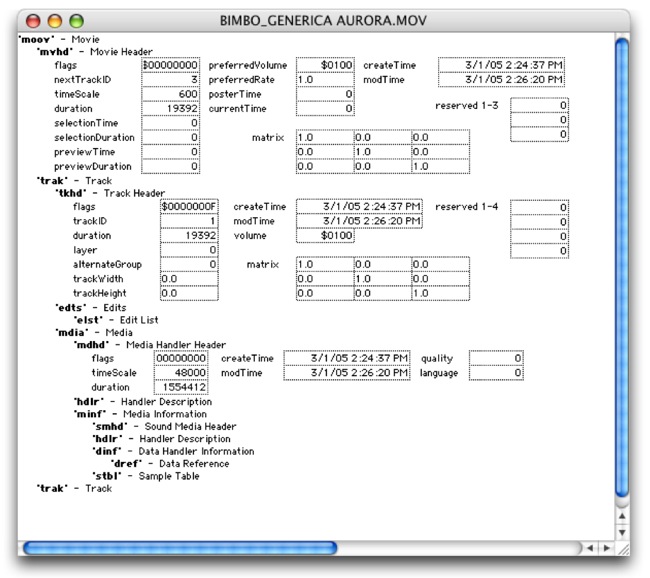
Despite the fact that there are lot of fields, some are easily comprehensive. For example, in mvhd we can see that the “timeScale” value (600), and it's “duration” (19592). The name of the mvhd atom is the abbreviation of movie header.
If we divide this last number by the “movie” time scale, the result will be 32,32 seconds. The movie is a Bimbo TV commercial. That was the duration of the commercial plus the countdown.
In mdia - mdhd the “timeScale” reads 48000. It is effectively speaking of the audio track. In “duration” it reads 1554412. In effect, dividing that number by the time scale on that track (48000) gives us, as a result, a duration of 32,383583333333 seconds. Yes. The tracks don't match in duration.
As you can see, all these values are coherent between them. If we change the Media time scale refering to the sound track from 48000 to any other number, and we don't change it's duration accordingly, sound would desynchronize as the “movie” plays. And, of course, it would end before or after the picture, and we would hear the pitch changing in proportion to this.
By clicking in each of the bold italic acronyms, a whole list of atoms is deployed. The values in the fields of these atoms, as we already said, are editable. But, beware... if we screw up we could end up with a corrupt, Frankenstein file, that only an expert could fix.
We only mentioned this program to check the values and it's correlation with the infinit amount of parameters that a QuickTime “movie” can have.
APPENDIX III: A word on Cinema Tools
What did Apple had in mind when Cinema Tools was developed? Was it created thinking of the PAL world sound editor and forgot to tell him?
None of that. Apple designed this program to solve many important issues to their Final Cut Pro users. Problems such as exporting a trusty negative cut list, for example. Or how to work with different frame rate materials in a single Time Line. For example, a negative captured at 24 fps mixed with PAL or NTSC video.
In order to solve this problems, Final Cut needed to keep track of every original negative frame through the video transfer and the digitalization to the QuickTime movie. It needed to keep a “One to One” relation between “virtual” frames and the actual original frames. For these, and other many reasons Apple created Cinema Tools.
It is the ability of Cinema Tools, to be able to fiddle with QuickTime movies, what allows us to present this change into the way we handle picture for sound post-production.
Back to Cinema Tools. We've changed the duration of a movie, keeping the same amount of frames. But...
- What did Cinema Tools did, exactly?
- Why did it do it so fast?
- And... Why is this process reversible?
A QuickTime file, as explained in Appendix II, is made of two big sections: the data and the recepy (the picture frames and the instructions explaining how to reproduce them).
Regarding “the recipe”, it can be said that it contains many components that tell the player what to do with the file. For example, it defines the Codec with which that data will be decodificated, the speed at which it should be played, when do the titles appear and when they dissappear (in case they exist), at which volume it should play it's sound tracks, etc, etc, etc. and the most important ingredient to solve the trouble which brings us here: for how long each frame of the data bag is exposed.
What Cinema Tools does is change that information. But it also calculates and changes every other information irrevocably asociated with that change. For example, the total duration of the movie is altered in proportion to the chosen frame rate.
To understand it better, if we could change that information so that the frame rate was 1 frame per second, the total duration of the movie with which we were playing before would be a lot longer. It would be 1502 seconds. That is, 25 minutes, 2 seconds, 00 frames.
Cinema tools does not render frames, it just changes the variables in the recipe, of the formula explaining the player what to do with that file. That is why Cinema Tools work so fast and without altering the picture resolution. And that is why it is reversible. It is, then, a benign alteration on the file. And as such, it is non-destructive.
For example, if after we order Cinema Tools to conform to 24 fps a video file originally at 25 fps, we order to return that same file to 25 fps, it will convert it once again in the same duration than the original had, and of course, with the same amount of frames than at first. All of this without degradation of the picture quality because, as we said, Cinema Tools doesn't get in the way of the file's Data, but instead it messes with it's MetaData. In other words, with the information describing the file information.