
Lectures > The Secret Life of Audio Crossfades
The Secret Life of Audio Crossfades
Since this information is not widely covered, I think it is particularly useful for most picture and sound editors.
I was recently giving a class on using digital audio workstations (DAWs). As I was describing how to make smooth crossfades and ramp outs, one of the students asked a question that led me into a lengthy dissertation on the nature of sound. Since this information is not widely covered, I think it is particularly useful for most picture and sound editors.
First, we need to understand our friend, the decibel. The decibel, or dB, is one tenth of a Bel. A Bel is a unit of sound named after Alexander Graham Bell. In addition to inventing the telephone, he did a great deal of research into the nature of how our ears perceive sound. As it happens, a difference of 1 dB of sound power is the smallest change our ears can perceive under ideal conditions.
Now, our ears are very sensitive. In fact, the total range of our hearing is 130 dBs, which can be expressed as a ratio of about 10 trillion to one. Because that number is so large, the dB is set to what's called a logarithmic, or log, scale to make sounds more convenient to measure. On this scale, if you double the power behind a sound you get a change of 3 dB. Double the power again and it increases another 3 dB, for a total increase of 6 dB. As an example, let's say you have a 100-watt amp and you replace it with a 200-watt amp. Your total power increase is just 3 dB. Replace that 200-watt amp with a 400-watt amp and your increase again is just 3 dB. Thus, a 400-watt amp has just 6 dB more power than a 100-watt amp.
The decibel as I just described it deals with sound in the air; that is, the sound we directly hear. But we measure decibels slightly different in audio consoles and DAWs. The meter on a console or DAW is measuring voltage, and it takes 6 dB of voltage to make the power increase by 3 dB. In other words, if you raise the level of a sound on a console by 6 dB, you are doubling the volume. A change of 12 dB higher would make a sound four times louder. I realize that it's a bit confusing to have these two different scales, but since we are normally working only with VU and peak meters - not SPL meters - we can just remember that a change of 6 dB is either twice or half the level of a sound.
What does this have to do with fades? A lot, actually. While a mixer can create a fade any way he wants simply by moving a fader at the proper speed, in a DAW we generally “apply” a fade to a clip using a specific fade curve. ProTools and Fairlight systems both allow for a variety of fade curves, and here I'll cover three of the most useful.
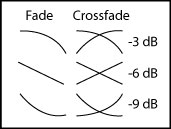
Figure 1
In Figure 1, you'll see fades labeled -3, -6 and -9. These names refer to the cross point of each fade, or the level of the audio at a point halfway into the fade. In the case of a crossfade, it's the point where the levels of the two pieces of audio being crossfaded are equal.
Now look at Figure 2A. Here we see two pieces of exactly the same audio. If we were to play them both at exactly the same time (in perfect phase), the volume would double, or increase the level by 6 dB. Therefore, if we want to have a perfectly smooth crossfade between these two identical pieces of audio, we'd use a -6 dB crossfade. Then, at the cross point, both pieces of audio would be lowered by 6 dB, meaning the net result would be a difference of 0 dB and the fade would be perfectly smooth.
Generally, though, we don't crossfade into the exact same piece of audio. We are typically trying to cross into a new and different sound clip, and we want to do this as smoothly as possible.
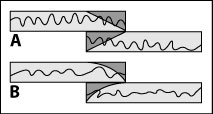
Figure 2
So what happens when we take two pieces of different audio that are at the same relative level? Look at Figure 2B. Because the pieces are different, the modulations of the audio do not match up in phase. As a result, when we play them together, the net effect is not an increase of 6 dB, because we are not actually doubling the sound. Instead, the sound increases by about 3 dB. It would probably take a book full of calculus equations to fully explain why, but suffice it to say that when you add two different sounds with the same relative level, the result is an increase of 3 dB. That means, in general, you should use a -3 dB crossfade. That way, at the cross point, the two pieces will match with no increase and you'll have a crossfade as smooth as a baby's bum.
When it comes to fades or ramps, though, the rules are a bit different. In a crossfade we are trying to match two different pieces of audio; in a ramp we're trying to get in or out of a sound gracefully. Here you'll probably find that a -3 dB fade or ramp is too abrupt. A -6 dB fade might do better. A -6 dB fade is basically the same as a mixer moving a fader from top to bottom at equal speed all the way. Sometimes this is referred to as a linear fade, although that's a misnomer, because the dB scale is logarithmic.
While the -6 fade is much smoother than a -3 fade, a -9 fade can be even better in many circumstances. A -9 fade will drop in volume very quickly, but then gradually taper out for the rest of the fade. A -12 dB fade is even more pronounced in this effect. This is similar to pulling a fader down rapidly, then slowing as you near the bottom of its travel. Either a -9 or a -12 fade can be very useful for getting out of music, or for effects you want to dissipate without drawing attention to them.
Of course, all this talk of decibels is quite academic. The most important thing to remember is: trust your ears! They're better than any VU meter money can buy.
Andy Somers is a Guild member and a picture editor, sound editor and mixer.
Reprinted from The Motion Picture Editors Guild Newsletter Vol. 20, No. 6 - Sep/Oct 1999.
Copyright © 1999, All Rights Reserved by The Motion Picture Editors Guild, IATSE Local 700.